Sunday 30 September 2018

LEVELLING


LEVELLING

WHAT IS LEVELLING?
Levelling is an operation in surveying performed to determine thedifference in levels of two points.By this operation the height of a point froma datum, known as elevation, is determined.

DEFINITIONS

LEVEL SURFACE
A level surface is the equipotential surface of the earth’s gravity field. It is acurved surface andevery element of which is normal to the plumb line.


LEVEL LINE
Any line laying on a levelled surface is called a level line. This line is normal to the plumb line (direction of gravity) at all points (Fig. - L.1).

HORIZONTAL PLANE
Any plane tangential to the level surface at any point is known as the ‘horizontal plane’. It is perpendicular to the plumb line which is indicates the direction of gravity.

Any line laying on the horizontal plane is said to be a horizontal line. It is a straight line tangential to the level line (Fig. - L.1).


VERTICALLINE
The direction indicated by a plumb line (direction of gravity) is known as the vertical line (Fig. L.1).

VERTICALLINE
Any line passing through the vertical line is known as the vertical plane.

DATUM
A datum is a reference surface of constant potential, called as a level surface of the earth’s gravityfield, for measuring the elevations of the points. One of such surfaces is the mean sea level surfaceand is considered as a standarddatum. Also, an arbitrary surface may be adopted as a datum.


Reduced level of a point is its height or depth above or below theassumed datum. It is the elevation of the point.


Line of Collimation:
  It is an imaginary line passing through the intersection of cross-hairs at the diaphragm and the optical centre of the object glass and its continuation. It is also known as line of sight.

  This axis is an imaginary line passing through optical centre of the object glass and the optical centre of the eye-piece.


Bench Mark (BM):
  This are fixed points or marks of known RL determined with reference to the dutam line. These are very important marks. They sever as reference points for finding RL of new points or for conducting levelling operation in projects involving roads, railways, etc.

  Bench-marks may be of four types in India [a] GTS, [b] permanent, [c] temporary, and [d] arbitrary.

[a] GTS Bench-marks – These bench-marks are established by Survey of India Department at a large interval all over the country. The value of reduce levels, the relevant position and the number of bench-marks are published by the department.


[c] Temporary Bench-marks – When the bench-marks are established temporarily at the end of day’s work; they are said to be temporary bench-marks. They are generally made on root of tree, the parapet of nearby culvert, a furlong post, or on a similar place.

[d] Arbitrary Bench-marks – When the RLs of some fixed points are assumed, they are termed arbitrary bench-marks. These are adopted in small survey operations when only the undulation of the ground surface is required to be determined.

Back sight (B.S.):
It is the first reading taken on the staff after setting up the level usuallyto determine the height of instrument. It is usually made to some form of a bench mark (B.M.) orto the points whose elevations have already been determined. When the instrument position mustbe changed, the first sight taken in the next section is also a back sight(Fig. - L.2).


Fore sight (F.S.):
It is the last reading from an instrument position on to a staff held at a point.It is thus the last reading taken within a section of levels before shifting the instrument to the nextsection, and also the last reading taken over the whole series of levels (Fig. - L.2).

Change point (C.P.) or turning point:
A change point or turning point is the point whereboth the fore sight and back sight are made on a staff held at that point. A change point is requiredbefore moving the level from one section to another section. By taking the fore sight the elevationof the change point is determined and by taking the back sight the height of instrument is determined.The change points relate the various sections by making fore sight and back sight at the same point (Fig. - L.2).

Height of instrument (H.I.) or height of collimation:
For any set up of the level, theelevation of the line of sight is the height of instrument (Fig. - L.2).

(Next post on “DIFFERENT TYPES OF LEVELS”)

Tuesday 18 September 2018

ERRORS AND PRECAUTIONS FOR PLANE TABLE SURVEYING


ERRORS AND PRECAUTIONS

  The followings are the common errors in the plane table.

[A]. Instrumental Errors

[1]. The fiducial edge of the alidade might not be straight.
[2]. The vane may not be vertical.
[3]. The surface of the table may not be perfectly levelled.
[4]. The horsehair may be loose and inclined.
[5]. The needle of the tough compass may not be perfectly balanced. Also,
       it may not be able to move freely due to sluggishness of the pivot point.
[6]. The table may be loosely joined with the tripod stand.

The above errors are adjustable or avoidable.

[B]. Personal Errors

[1]. The table may not be centred perfectly.
[2]. The levelling of the table may not be perfect.
[3]. The orientation of the table may not be proper.
[4]. The table might not be perfectly clamped.
[5]. The objects may not be bisected perfectly.
[6]. The alidade may not be correctly centred on the station point.
[7]. The rays might not be drawn accurately.
[8]. The alidade may not be centred on the same side of the station point
       throughout the work.

[C]. Plotting Errors
[1]. A good quality pencil with a very fine pointed end may not have been used.
[2]. An incorrect scale may be used by mistake.
[3]. Errors may result from the failure to observe the correct measurement 
       from the scale.
[4]. Unnecessary hurry at the time of plotting may lead to plotting errors.

The following precautions should be taken when using the plane table.

[1].  Before starting the work, the equipment of the survey work should 
       be verified. Defective accessories should be replaced by perfect 
       equipment. 
[2].  The centring should be perfect.
[3].  The levelling should be proper.
[4].  The orientation should be accurate.
[5].  The alidade should be centred on the same side of the station-pi until 
        the work is completed. 
[6].  While shifting the plane table from one station to another, the tripod 
       stand should be kept vertical to avoid damage to the fixing arrangement.    
[7].  Several accessories must be carried. So, care should be taken to 
       ensure that nothing is missing. 
[8].  The pencil should have a sharp point.
[9].  The distance of the objects or line should be written temporarily along 
        the respective rays until the plotting is completed.
[10]. Only the selected scale should be on the table.
[11]. Measurements should be taken carefully from the scale while plotting.
[12]. The stations on the ground are marked A, B, C, D etc. while station 
        point on the map are marked abcd etc.

(Next post on “LEVELLING”)


Saturday 8 September 2018

SPACIAL METHOD OF RESECTION


SPACIAL METHOD OF RESECTION

Sometimes, after completion of plane table traversing, it may be noticed that an important object has not been located due to oversight. If no station pers are found on the field, some special methods of resection are applied in order to establish a new station for plotting the missing object. The methods are based on:
[1]. The two-point problem, and [2] the three-point problem.

The two-point problem: In this problem, two well defined points whose positions have already been plotted on the plan are selected. Then, by perfectly bisecting this point, a new station is established at required position.  


Procedure [a] Suppose P and Q are two well-defined points whose positions are plotted on the map as p and q. It is required to locate a new station at A by perfectly bisecting P and Q.  

[b]. An auxiliary station B is selected at a suitable position. The table is set up at B and levelled and oriented by eye estimation. It is then clamped.

[c]. With the alidade touching p and q, the points P and Q are bisected, and rays are drawn. Suppose these rays intersect at b.

[d]. With the alidade centred on b, the ranging rod at A is bisected and a ray is drawn. Then, by eye estimation, a point a₁ is marked on the ray.

[e]. The table is shifted and centred on A, with a₁ just over A. It is levelled and oriented by back-sighting. With the alidade touching p, the point P is bisected, and a ray drawn. Suppose this ray intersects and line ba₁ at point a₁, as was assumed previously.

[f]. With the alidade centred on a₁, the point Q is bisected, and a ray is drawn. Suppose this ray intersects the ray bq at point q₁. The triangle pqq₁ is known as the triangle of error and is to be eliminated.

[g]. The alidade is placed along the line pq₁ and a ranging R is fixed at some distance from the table. Then, the alidade is placed along the line pq and the table is turned to bisect R. At this position the table is saib to be perfectly oriented.

[h]. Finally, with the alidade centred on p and q, the points P and Q bisected and rays are drawn. Suppose these rays intersect at a point a. This would represent the exact position of the required station A (Fig. 14). Then the station A is marked on the ground.


The three-point problem: In this problem, three well defined points are selected whose positions have already been plotted on the plan. Then, by perfectly bisecting these three well-defined point, a new station is established at required position.  
  No auxiliary station is required in order to solve this problem. The table is directly placed at the required position. The problem may be solved by three methods: [a] the graphical or Bessel’s method, [b] the mechanical method and [c] the trial-and-error method.  


[a] The Graphical Method [i] Suppose A, B and C are three well-defined points which have been plotted as a, b and c. Now it is required to locate a new station at P.

[ii] The table is placed at the required station P and levelled. The alidade is placed along the line ac and the point A is bisected. The table is clamped. With the alidade centred on C, the point B is bisected, and ray is drawn (Fig.15.a).


[iii] Again the alidade is placed along the line ac and the point C is bisected, and the table is clamped. With the alidade touching a, the point B is bisected, and a ray is drawn. Suppose this ray intersects the previous ray at point d (Fig. 15.b).

[iv] The alidade is placed along db and the point B is bisected. At this position the table is said to be perfectly oriented. Now the ray Aa, Bb and Cc are drawn. These three rays must meet a point p which is required point on the map. The point is transferred to the ground by the U-fork and plumb bob (Fig. 15.c).


[b] The Mechanical Method [i] Suppose A, B and C are three well-defined points which have been plotted as a, b and c. It is required to locate a new station at P. 

[ii] The table is placed at P and levelled. A tracing paper fixed on the map and a point p marked on it.

[iii] With the alidade centred on P, the points A, B and C are bisected, and rays are drawn. These rays may not pass through the points a, b and c as the orientation is done approximately (Fig.16.a).

[iv] Now the tracing paper unfastened and move over the map in such a way that the three rays simultaneously pass through the plotted position a, b and c. Then the point p is pricked with a pin to give an impression p on the map, p is the required point on the map. The tracing paper is then removed (Fig. 16.b).

[v] Then the alidade is centred on p and the rays are drawn towards A, B and C. These rays must pass through the points a, b and c.


[c] The Trial-and-Error Method [i] Suppose A, B and C are three well-defined points which have been plotted as a, b and c. Now it is required to establish a point at P. 

[ii] The table is set up at P and levelled. Orientation is done by eye estimation.

[iii] With the alidade, rays Aa, Bb and Cc are drawn. As the orientation is approximate, the rays may not intersect at a point, but may form a small triangle the triangle of error.

[iv] To get the actual point, this triangle of error to be estimated. By repeatedly turning the table clockwise and anti-clockwise, the triangle is eliminated in such a way that the rays Aa, Bb and Cc finally meet a point p. This is the required point on the map. This point is transferred to the ground by U-fork and plumb bob (Fig. 17)


(Next post on “ERRORS AND PRECAUTIONS”)


Saturday 1 September 2018

METHOD OF PLANE TABLING


METHOD OF TABLING

  The following are the four methods of the plane tabling.

[1]. Radiation
[2]. Intersection
[3]. Traversing and
[4]. Resection.

Radiation: The method is suitable for locating the objects from a single section. In this method, rays are drawn from the station to the objects, and the distance from the station to the objects are measured and plotted to any suitable scale along the respective rays.

Procedure [a] Suppose P is a station on ground from where the objects A, B, C, and D are visible.

[b]. The plane table is set up over station P. a drawing sheet fixed on the table which is then levelled and centred. A point p selected on the sheet to represent the station P.

[c]. The north line is marked on right-hand top corner of the sheet with tough compass or circular box compass.


[e]. The distance PA, PB, PC, and PD are measured and plotted to any suitable scale to obtain the point a, b, c, and d, representing the objects A, B, C, and D (Fig. 10), on paper.


The Intersection method: The method is suitable for locating inaccessible points by intersection of the rays drawn from two instrument stations.

Procedure [a] Suppose A and B are two station and P is an object on the far bank of river. Now it is required to fix the position of P on the sheet by intersection of rays, drawn from A and B.

[b]. The plane table is set up at A. It is levelled and centred so that a point a on the sheet is just over station A. The north line is marked on the right-hand top corner. The table is then clamped.

[c]. With the alidade touching a, the object P and the ranging rod at B are bisected and rays are drawn through the fiducial edge of the alidade.

[d]. The distance AB is measured and plotted to any suitable scale to obtain the point b.

[e]. The table is shifted and centred over B and levelled properly. Now the alidade is placed along the line ba and orientation is done by back-sighting. At this time, it should be remembered that the centring, levelling and orientation must be perfect simultaneously. 

[f]. With the alidade touching b, the object P is bisected, and ray is drawn. Suppose the ray intersect the previous ray at p. This point p is the required plotted position of P (Fig. 11).


The Traversing method: The method is suitable for connecting the traverse stations. This is similar to compass traversing or theodolite traversing. But here fielding and plotting are done simultaneously with the help of radiation and intersection methods.

Procedure [a] Suppose A, B, C and D are the traverse stations.

[b]. The plane table is set up at station A. A suitable point a selected on the sheet in such a way that the whole area may be plotted in the sheet. The table is centred, levelled and clamped. The north line is marked on the right-hand top corner of the sheet.

[c]. With the alidade touching a, the ranging rod at B is bisected and a ray is drawn. The distance AB is measured and plotted to any suitable scale.


[e]. With the alidade touching b, the ranging rod at C is bisected and a ray is drawn. The distance BC is measured and plotted to the same scale.


[g]. In this manner, all stations of the traverse are connected.

[h]. At the end, the finishing point may not coincide with the starting point and may be some closing error. This error is adjusted graphically by ‘Bowditch’s rule’.


The resection method: The method is suitable for the establishing new stations at a place in order to locate missing details.

Procedure [a] Suppose it is required to establish a station at position P. Let us select two points A and B on the ground. The distance AB measured and plotted to any suitable scale. The line AB is known as the ‘base line’.

[b]. The plane table is set up at A. It is levelled and centred and oriented by bisecting the ranging rod at B. The table is then clamped.

[c]. With the alidade touching a, the ranging rod at P is bisected and a ray is drawn. Then a point P₁ is marked on this ray by estimating with the eye.

[d]. The table is shifted and centred in such a way P₁ is just over P. It is then oriented by back-sighting the ranging rod at A.

[e]. With the alidade touching b, the ranging rod at B. Suppose this ray intersects the previous ray at a point P. This point represents the position of the station P on the sheet. Then actual position of the station P is marked on the ground by U-fork and plumb bob (Fig. 13).


(Next post on “SPACIAL METHOD OF RESECTION”)


ESTIMATING

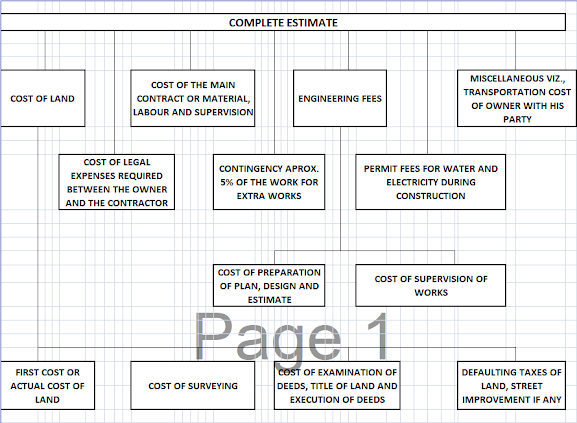
  ESTIMATING   What is an Estimate?       Before starting any work for it’s execution the owner or client or builder or contractor shoul...